Trigger Outbound Simulations
Testing Your Voice Agent with Evalion's Outbound Voice Simulations
In this tutorial, you'll learn how to configure your voice agent to work with Evalion's outbound voice simulation feature for realistic, automated testing.
What you'll accomplish:
- Set up a trigger endpoint to receive test initiations from Evalion
- Configure your system to make outbound SIP calls with required headers
- Connect your outbound agent configuration in Evalion
- Run your first automated outbound voice test
What is Outbound Voice Simulation?
Outbound Voice Simulation lets you test your voice agent against realistic customer interactions simulated by Evalion. In order for the customer to be able to call Evalion (simulating a real outbound case), Evalion triggers your system to initiate the call creating a production-like environment where your agent calls the customer (in this case Evalion simulation agent)
Why Test with Evalion Simulations?
Testing a voice agent in production is risky. Evalion's outbound voice simulations let you:
- Test before going live - Catch issues before real customers interact with your agent
- Simulate real scenarios - Use predefined personas and scenarios to test specific use cases
- Measure performance - Get quantitative metrics on how well your agent handles conversations
- Iterate safely - Make changes and test them without affecting real users
- Build confidence - Know your agent can handle the conversations you expect
How Outbound Voice Testing Works
sequenceDiagram
    participant SC as Simulated Customer
    participant E as Evalion
    participant TE as Trigger Endpoint
    participant VS as Your Voice Agent
    participant Y as You

    Note over E: 1. Generate simulation_idand phone_number

    E->>TE: 2. POST /trigger-endpoint{simulation_id, phone_number}

    Note over TE: 3. Extract test details(simulation_id, phone_number)

    TE->>VS: 4. Initiate SIP call

    VS->>E: SIP INVITETo: phone_numberHeader: X-SIMULATION-ID

    E->>SC: 5. Route to simulation based on simulation_id

    SC-->>VS: Simulated customer responds
    VS-->>SC: Agent responds
    SC-->>VS: Conversation proceeds(scenario + persona)
    Note over SC,VS: Conversation continuesaccording to test scenario

    SC->>E: 6. End call & sendconversation data

    E->>E: Analyze interactionagainst metrics

    E->>Y: Results & detailed analysis
Understanding the complete flow helps you configure your system correctly:
-
Evalion triggers your system - Sends an HTTP POST request to your trigger endpoint with test details (
simulation_idandphone_number) -
Your system initiates an SIP call - Uses your telephony infrastructure to place an outbound call to Evalion's SIP address
-
SIP header includes simulation ID - Your system adds the
X-SIMULATION-IDheader to route the call to the correct test -
Conversation proceeds - Your agent interacts with Evalion's simulated customer following the defined scenario and persona
-
Results and analysis - Evalion records the conversation, evaluates performance against metrics, and provides detailed feedback
The key requirement: Your system must be capable of initiating outbound SIP calls with custom headers. The specific implementation depends on your telephony infrastructure (LiveKit, Twilio, Vonage, custom SIP servers, etc.).
Prerequisites
Before following this tutorial, ensure you have:
Technical Requirements
- Outbound calling capability - Your voice agent can initiate SIP calls programmatically
- Custom header support - Your telephony system can add custom SIP headers to outbound calls
- HTTP endpoint capability - You can create a publicly accessible HTTPS endpoint
- API authentication - Ability to validate incoming HTTP requests
Evalion Setup
- Evalion account with agent access
- Test suite configured with scenarios, personas, and metrics
- Evalion SIP details - SIP address and from technical onboarding
Don't have SIP details yet? Contact Evalion support or schedule technical onboarding to receive your unique SIP address. You'll need these to complete the integration.
Recommended Background
This tutorial assumes you're familiar with:
- Building and deploying voice agents
- Basic HTTP API concepts
- Your telephony system(LiveKit, Twilio, or other)
New to Evalion testing? Complete the Create Custom Test Cases tutorial first to understand scenarios, personas, and metrics.
1. Set Up Your Trigger Endpoint
Your trigger endpoint is the bridge between Evalion and your Voice Agent. When you run a test, Evalion sends an HTTP request to this endpoint with the test details, and your Outbound Voice Agent responds by initiating an outbound call. Let's set this up.
Create Your Endpoint
First, create an HTTP endpoint that accepts POST requests. This endpoint will receive call triggers from Evalion.
Your endpoint must:
- Accept POST requests
- Use a valid HTTPS URL (e.g.,
https://api.yourcompany.com/sip/call) - Be publicly accessible or whitelisted for Evalion's IP ranges
- Return a 2xx status code when successfully triggered
Example endpoint structure:
@app.post("/sip/call", status_code=status.HTTP_200_OK)
async def handle_evalion_trigger(request: Request):
    # Extract test details from request
    payload = await request.json()
    simulation_id = payload.get("simulation_id")
    phone_number = payload.get("phone_number")

    # Initiate your outbound call
    await initiate_call(simulation_id, phone_number)

    # Confirm receipt
    return {"status": "success"}
Secure Your Endpoint with Headers
Add authentication to ensure only Evalion can trigger your endpoint. Configure the headers you want Evalion to include with every request.
Add these headers:
{
  "Content-Type": "application/json",
  "X-API-Key": "your-secret-api-key"
}
In your endpoint code, validate the authorization header:
@app.post("/sip/call")
async def handle_evalion_trigger(request: Request):
    # Verify the request is from Evalion
    api_key = request.headers.get("X-API-Key")
    if api_key != "your-secret-api-key":
        return {"error": "Unauthorized"}, 401

    # Process the trigger...
Common authentication options:
X-API-Key: <key>- API key authentication (recommended)- Custom headers for additional routing or identification
Define Your Payload Structure
Next, define what data structure your endpoint expects to receive. Evalion will send a JSON payload containing the call details, and you can structure it to match your system's needs.
Here's an example payload:
{
  "voiceAgentId": "483ecd85-94f7-4606-8e85-fde250b8d1fa",
  "participantPhoneNumber": "<phone_number>",
  "callData": {
    "simulationId": "<simulation_id>",
    "customerName": "Sarah",
    "language": "english"
  }
}
Notice the <simulation_id> and <phone_number> placeholders - these are template variables that Evalion will replace with actual values when running simulations.
Add Template Variables
Template variables tell Evalion where to inject test-specific data. You must include two required variables:
<simulation_id>- Unique identifier for routing the call to the correct simulation<phone_number>- The number to call (Evalion's simulated customer)
You have two options for including these template variables:
Option 1: Place them in your payload structure
Add the template variables anywhere in your payload that make sense for your system:
{
  "agent_id": "your-agent-id",
  "destination": "<phone_number>",
  "metadata": {
    "test_run_id": "<simulation_id>",
    "scenario": "booking_flow"
  }
}
When Evalion starts a simulation, it replaces the templates with real values:
{
  "agent_id": "your-agent-id",
  "destination": "+1-555-867-5309",
  "metadata": {
    "test_run_id": "sim_abc123xyz789",
    "scenario": "booking_flow"
  }
}
Option 2: Let Evalion add them automatically
If you don't include the template variables, Evalion automatically adds them to the root of your payload:
Your configured payload:
{
  "agent_id": "your-agent-id",
  "custom_data": "your-value"
}
What Evalion actually sends:
{
  "simulation_id": "sim_abc123xyz789",
  "phone_number": "+1-555-867-5309",
  "agent_id": "your-agent-id",
  "custom_data": "your-value"
}
Tip: If your system has specific field name requirements, use Option 1 to place the template variables exactly where you need them.
Test Your Endpoint
Before connecting to Evalion, verify your endpoint works correctly:
curl -X POST <https://api.yourcompany.com/sip/call> \
  -H "Content-Type: application/json" \
  -H "X-API-Key: your-secret-api-key" \
  -d '{
    "simulation_id": "test_123",
    "phone_number": "+15555551234"
  }'
Expected response:
{
  "status": "success"
}
If you see this response, your trigger endpoint is ready for the next step: configuring SIP outbound calling.
2. Configure SIP Outbound Calling
Your system needs to initiate an outbound SIP call when triggered by Evalion. The specific implementation depends on your telephony system, but the requirements are universal.
Required SIP Configuration
Regardless of which telephony system you use, your SIP calls must meet these requirements:
Destination:
- SIP Address: Provided by Evalion during technical onboarding
- Example:
3zq2lpla3mg.sip.evalion.ai
Transport Protocol:
- Must use TCP (not UDP or TLS)
- Port: Standard SIP port for TCP
Required SIP Header:
X-SIMULATION-ID: [simulation_id from trigger payload]
This header is critical - it tells Evalion which simulation this call belongs to.
Call Parameters:
- To: Phone number from Evalion's trigger request (
<phone_number>) - From: Your agent's caller ID number
Important: The SIP address and phone number are unique to your Evalion account. Contact Evalion support or complete technical onboarding to receive these details.
Implementation Checklist
When your trigger endpoint receives a request from Evalion, your system must:
- Extract
simulation_idandphone_numberfrom the trigger payload - Initiate an SIP call to Evalion's SIP address
- Include
X-SIMULATION-IDheader with the simulation ID value - Use TCP as the transport protocol
- Set appropriate timeout values (recommend 300 seconds minimum for conversational flows)
- Handle call failures gracefully and return appropriate error status
LiveKit Implementation Example
Now, let's create an example impelementation of the Outbound Voice Simulation using the LiveKit Telephony System.
Let's configure LiveKit to actually make the outbound calls to Evalion's simulated customers. This involves creating an SIP trunk that connects to Evalion's testing platform and setting up your agent to initiate calls through that trunk.
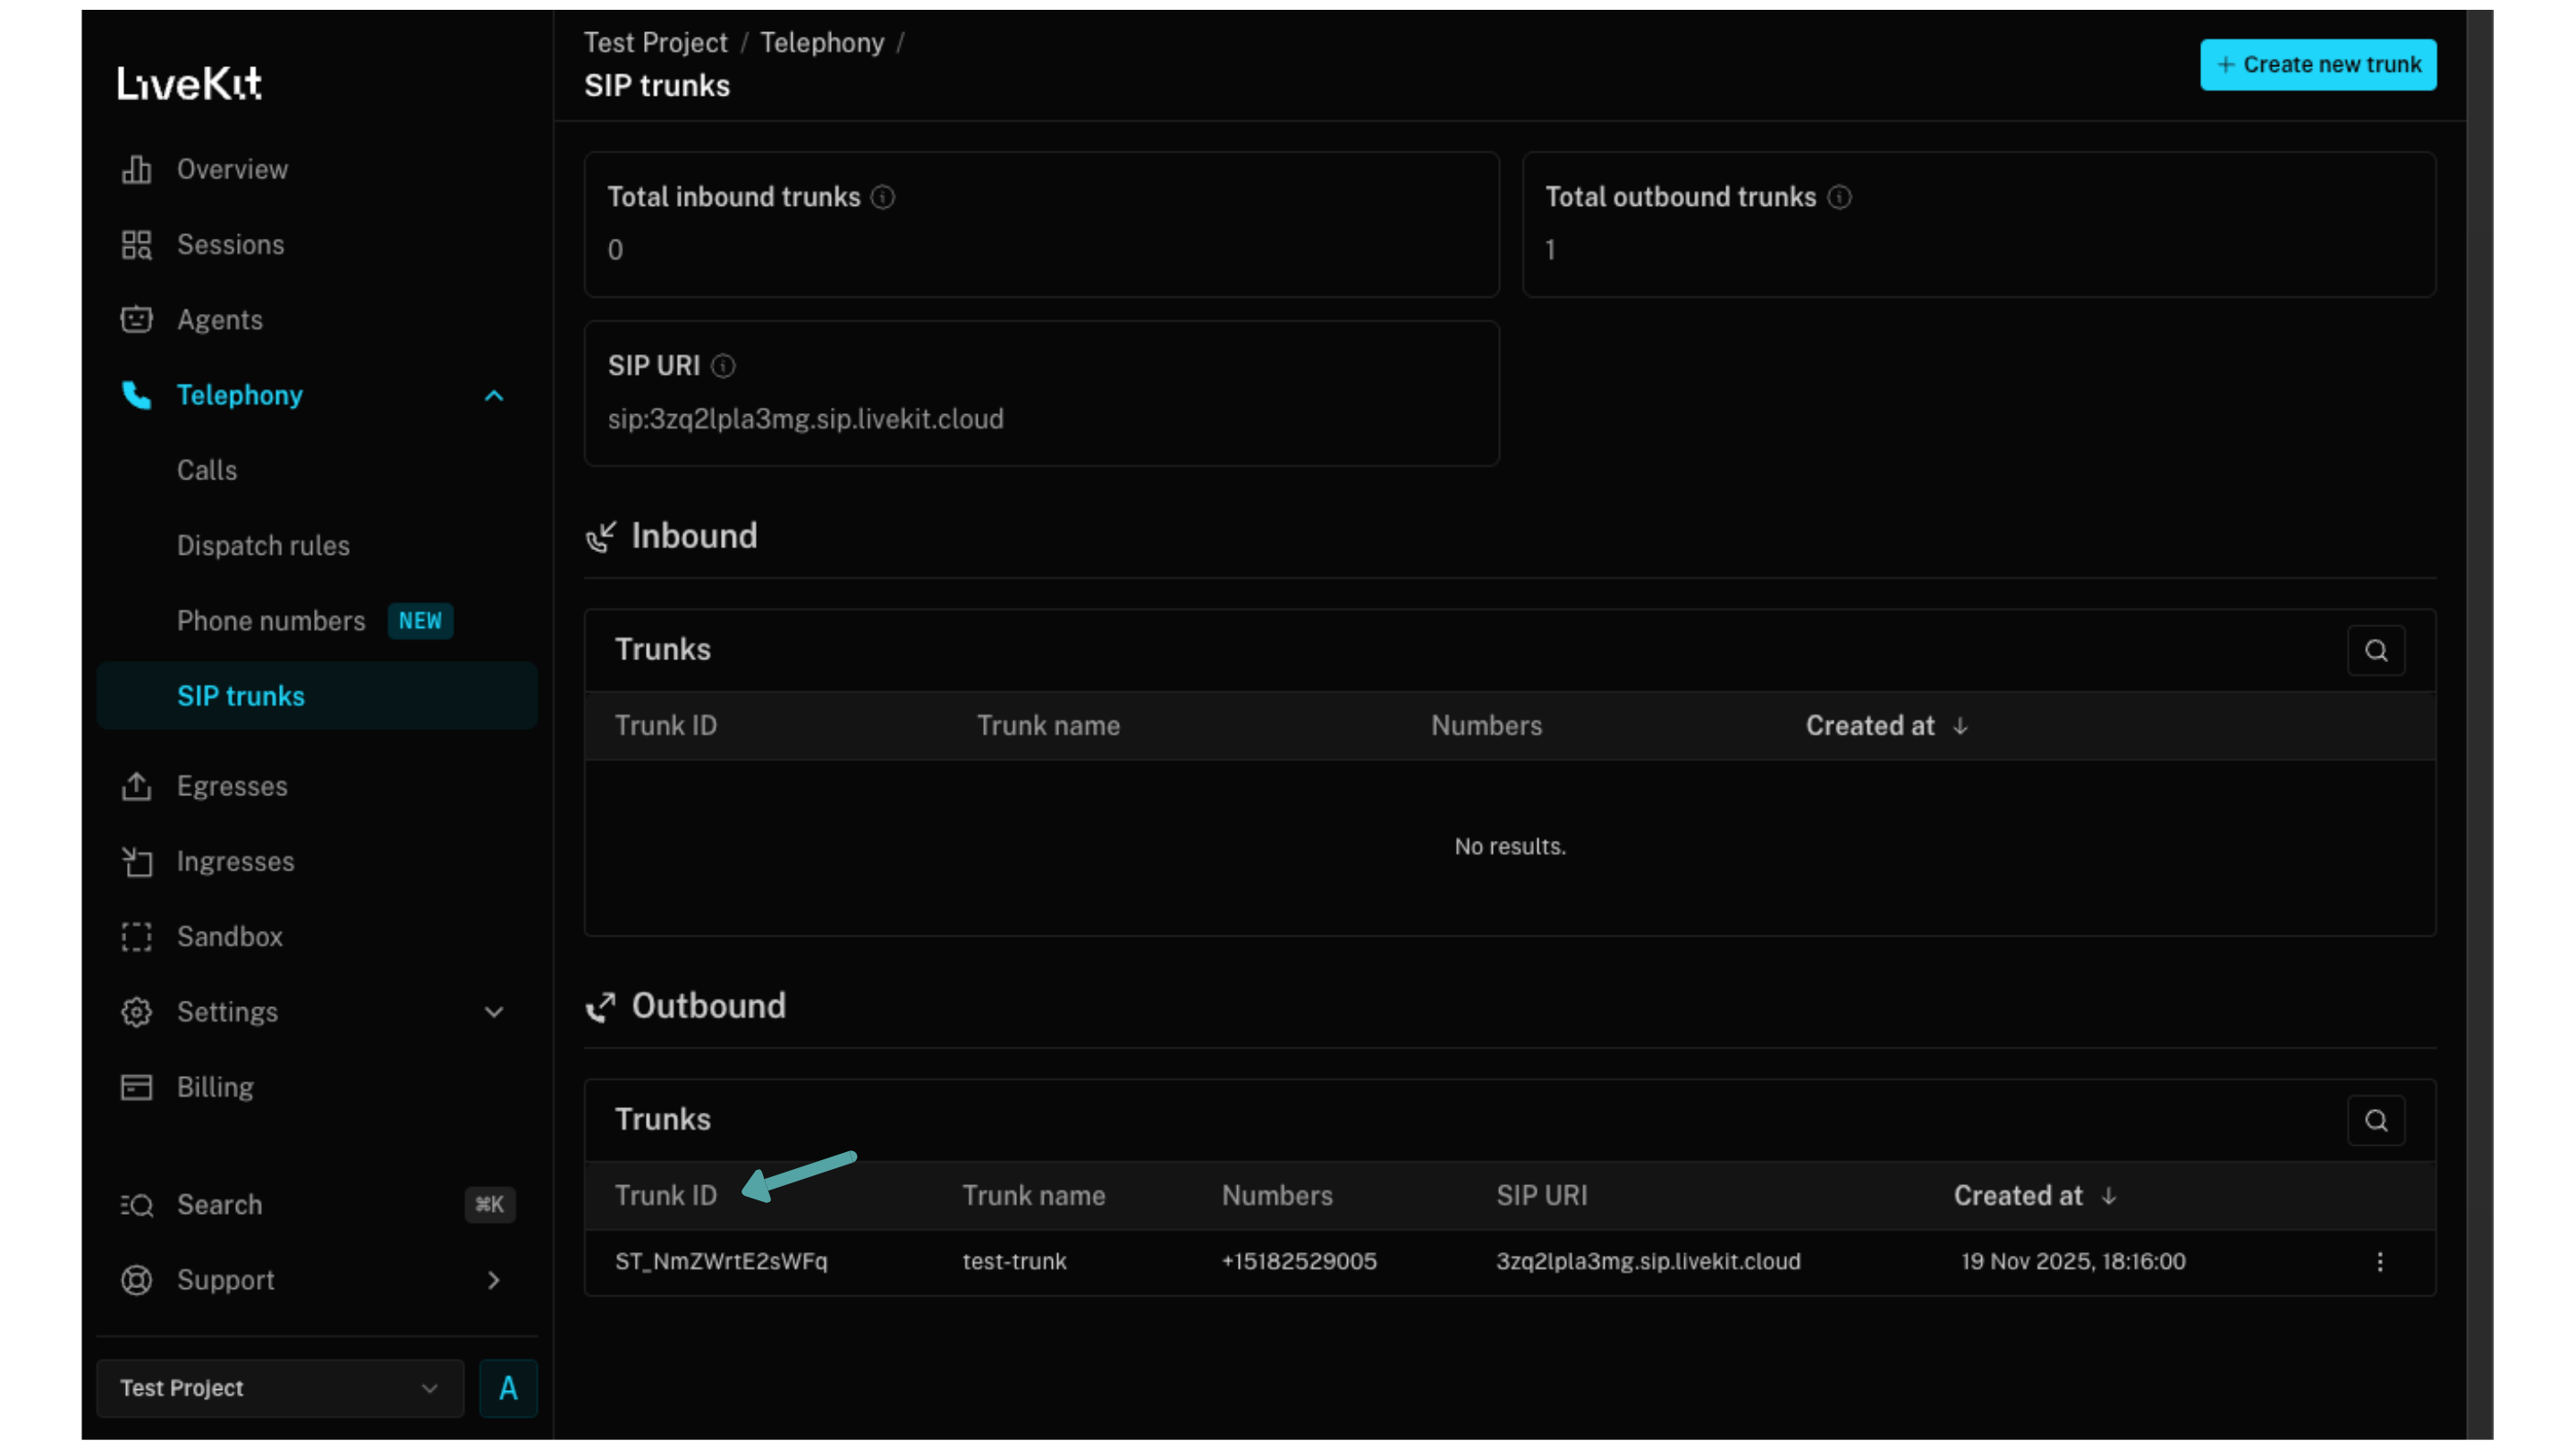
Step 1: Create an Outbound Trunk
A LiveKit Outbound Trunk enables your agent to make voice calls using SIP (Session Initiation Protocol) over the internet. This trunk will route calls from your agent to Evalion's simulated customers.
Follow these steps to create your trunk:
-
Log in to your LiveKit Cloud account and select the project where your voice agent is deployed.
-
Navigate to Telephony → SIP Trunks

-
Click Create new trunk in the top right corner
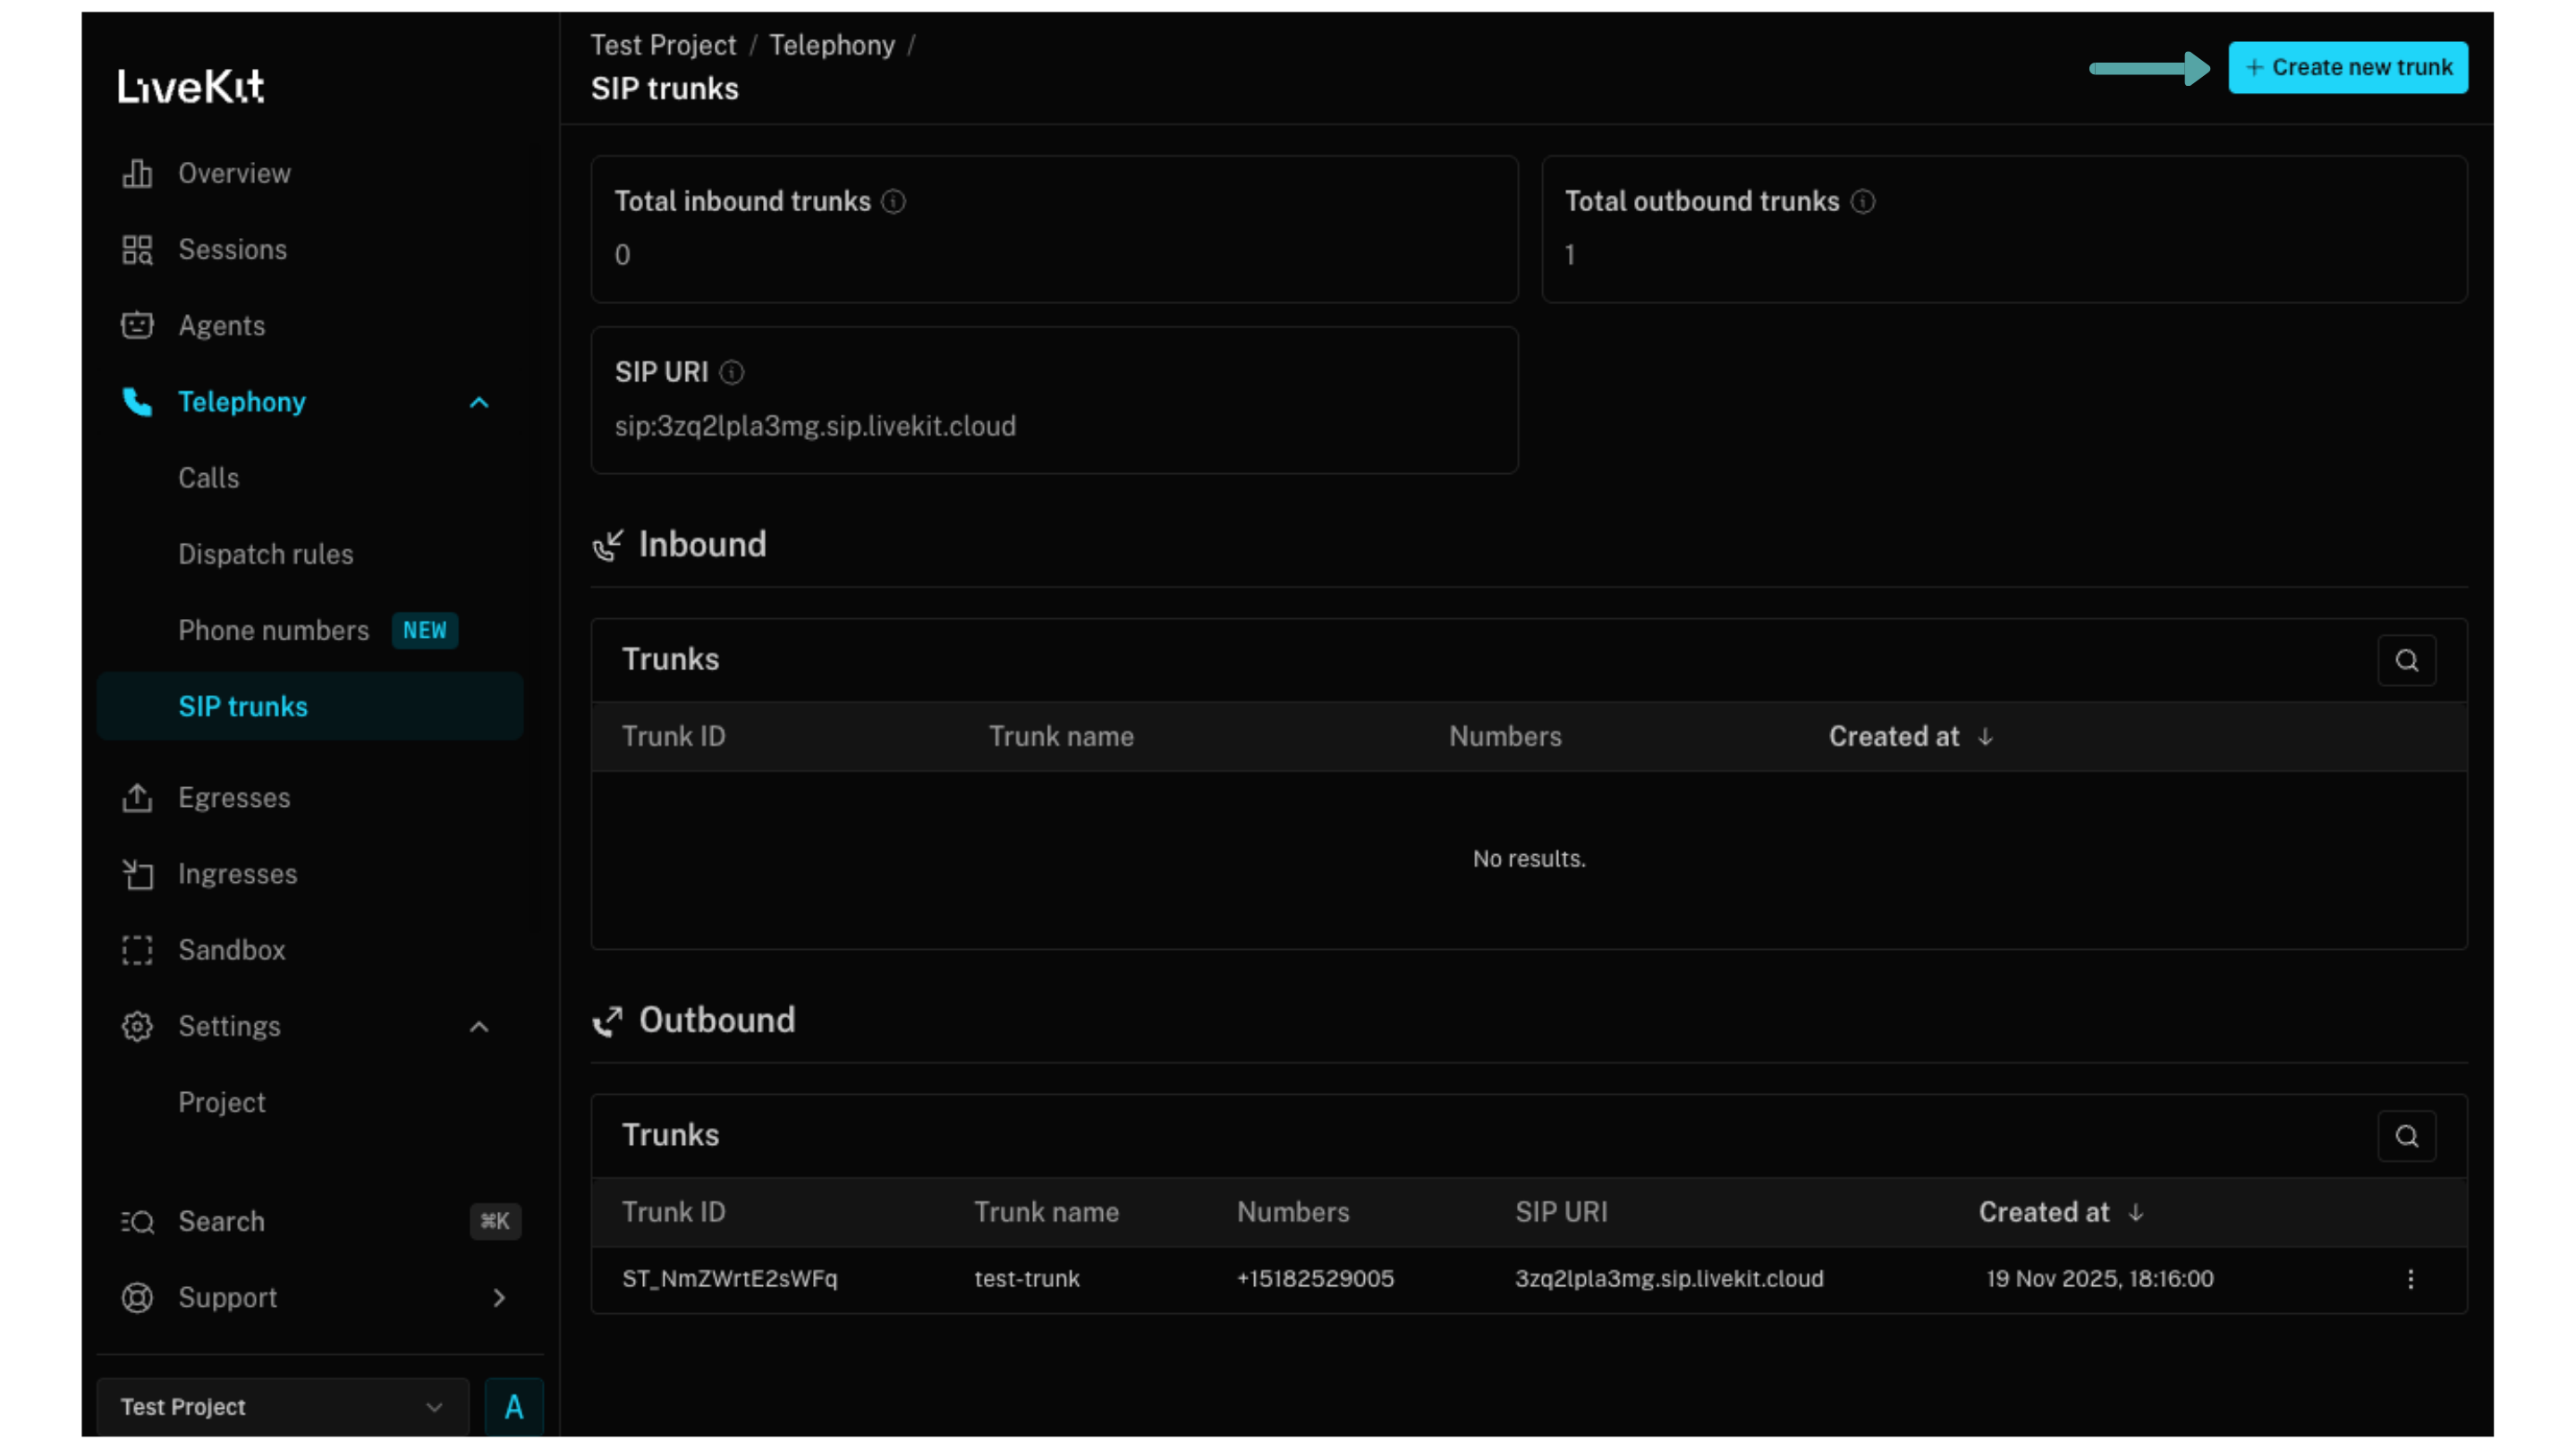
-
Configure your trunk with these settings:
- Trunk name:
evalion-outbound-testing(or your preferred name) - Direction: Select Outbound
- SIP Address: Enter the Evalion SIP address provided during technical onboarding
- Transport: Select TCP from the dropdown
- Phone Numbers: Enter your agent's outbound caller ID number

- Trunk name:
-
Click Create to save your trunk
Important: Copy and save your Trunk ID - you'll need it in the next step. The Trunk ID appears in the list of outbound trunks after its creation.
Step 2: Set Up SIP Call Initiation
LiveKit uses SIP (Session Initiation Protocol), which enables voice calls over the internet instead of traditional phone lines. Your LiveKit trunk routes calls through your data network directly to Evalion's testing platform, making the process faster and more cost-effective than traditional phone systems.
Update your trigger endpoint to initiate SIP calls via LiveKit:
import asyncio
from livekit import api
from livekit.protocol.sip import CreateSIPParticipantRequest
from fastapi import Request

@app.post("/sip/call", status_code=status.HTTP_200_OK)
async def handle_evalion_trigger(request: Request):
    # Verify authorization
    api_key = request.headers.get("X-API-Key")
     if api_key != "your-secret-api-key":
        return {"error": "Unauthorized"}, 401

    # Extract the simulation details from Evalion's request
    payload = await request.json()
    simulation_id = payload["callData"]["simulationId"]
    phone_number = payload["participantPhoneNumber"]

    # Initialize LiveKit API
    livekit_api = api.LiveKitAPI()

    try:
        # Create SIP participant to initiate the call
        sip_request = CreateSIPParticipantRequest(
            sip_trunk_id="ST_xxxxxxxxxxxxx",   # Your SIP trunk ID
            sip_call_to=phone_number,          # Evalion's simulated customer number
            room_name=f"evalion-test-{simulation_id}",  # Unique room per simulation
            participant_identity=f"agent-{simulation_id}", # Track by simulation
            participant_name="FitCore Agent", # Your agent's display name
            headers={"X-SIMULATION-ID": simulation_id}, # Your SIP Header
            participant_metadata=simulation_id, # Store simulation ID for tracking
            krisp_enabled=True, # Enable noise cancellation
            wait_until_answered=True # Wait for customer to answer
        )

        participant = await livekit_api.sip.create_sip_participant(sip_request)
        print(f"Call initiated for simulation {simulation_id}")

        return {
            "status": "success",
            "participant_id": participant.participant_identity
        }

    except Exception as e:
            print(f"Error initiating call: {e}")
            return {"error": str(e)}, 500

    finally: await livekit_api.aclose()
Key configuration details:
sip_trunk_id: Your trunk ID from the previous step (starts withST)sip_call_to: The<phone_number>template variable from Evalion's trigger requestroom_name: Create a unique room for each simulation using the simulation IDparticipant_identity: Include the simulation ID to track which test this call belongs toparticipant_metadata: Store the<simulation_id>here - LiveKit includes this in SIP headerskrisp_enabled: Reduces background noise for clearer audio analysiswait_until_answered: Ensures the call connects before proceeding
Next, you'll configure these settings in the Evalion platform so it knows how to trigger your agent to initiate an outbound call.
Step 3: Configure Evalion to Trigger Your Agent
Now that your trigger endpoint and LiveKit integration are ready, let's configure Evalion to initiate your outbound voice agent. You'll connect your voice agent in the Evalion platform so it knows how to trigger your system when running simulations.
Connect Your Outbound Agent
Evalion needs to know how to trigger your agent when starting simulations. You'll configure your trigger endpoint details once, and Evalion will use this configuration for every test run.
Follow these steps:
-
Log in to your Evalion account and navigate to Agents in the left sidebar:

-
Click Connect Agent:

-
Configure the basic agent settings:
- Agent Name:
FitCore Booking Agent(or your preferred name) - Language: Select your agent's primary language
- Agent Name:
-
Select the Outbound Voice simulation type

-
Configure your outbound settings:
- Max Conversation Time:
300seconds (5 minutes recommended for booking flows) - Trigger Endpoint URL: Use your actual endpoint URL from Step 1.
- Request Headers: These are the headers Evalion will include with every trigger request.
- Request Payload: The data structure Evalion sends to your trigger endpoint. Copy the payload structure from Step 1, ensuring it includes
<simulation_id>and<phone_number>template variables.

- Max Conversation Time:
-
Click Connect Agent to save your configuration and connect your voice agent:

Your agent is now connected and ready to receive test triggers from Evalion.
Verify Your Configuration
Before running a full test, verify your connection is working:
- In the Agents tab, find your newly connected agent.
- Review the configuration details to ensure all fields are correct
If you need to update any settings, select your agent and click the Edit button.
What Happens Next?
When you run a test suite on Evalion with this agent:
- Evalion generates a unique
simulation_idand assigns aphone_number - Evalion sends a POST request to your trigger endpoint with these values included
- Your endpoint receives the request and extracts the test details
- Your system initiates a SIP call to Evalion's simulated customer
- The conversation proceeds according to your scenario and persona
- Evalion analyzes the interaction and provides detailed results
You're now ready to run your first outbound voice test!
To run your Evalion test suite using your outbound agent, check out this tutorial on how to Launch a Test Suite and Interpret Outcomes
Troubleshooting
If you encounter issues during setup, here are common problems and their solutions:
Trigger Endpoint Not Receiving Requests
Problem: Test starts in Evalion, but your endpoint never receives the trigger request.
Solutions:
- Verify endpoint accessibility: Test your endpoint manually using curl:
  curl -X POST <https://api.yourcompany.com/sip/call> \\
    -H "Content-Type: application/json" \\
    -H "Authorization: Bearer your-api-key" \\
    -d '{"test": "connection"}'
Expected: 200 OK response
- Check authentication headers: Ensure the headers in Evalion match exactly what your endpoint expects (including "Bearer" prefix, capitalization, etc.)
- Review firewall rules: Whitelist Evalion's IP ranges if your endpoint isn't publicly accessible.
- Inspect endpoint logs: Look for incoming requests at the time you initiated the test. No logs means the request isn't reaching your server.
SIP Calls Not Connecting
Problem: Trigger endpoint receives requests successfully, but LiveKit doesn't establish the call.
Solutions:
- Verify trunk configuration:
- Confirm the SIP address in your telephony system matches the one Evalion provided during onboarding
- Ensure transport is set to TCP (not UDP or TLS)
- Check phone number format: The phone number should be in E.164 format (e.g.,
+15555551234) - Validate simulation ID header Confirm your code includes the X-SIMULATION-ID header with the simulation ID from Evalion's trigger request:
# For LiveKit
headers={"X-SIMULATION-ID": simulation_id}
Template Variables Not Replaced
Problem: Your endpoint receives <simulation_id> as literal text instead of actual values.
Solutions:
- Check exact spelling: Template variables are case-sensitive and must be:
<simulation_id>(not<simulation-id>or<simulationId>)<phone_number>(not<phoneNumber>or<phone-number>)
- Verify payload structure in Evalion: Review your configured payload in the agent settings to ensure templates are present
- Try automatic injection: If manual placement isn't working, remove the template variables from your payload and let Evalion add them automatically at the root level
Call Connects, But Test Fails
Problem: The call is established, but Evalion marks the simulation as failed.
Solutions:
- Verify simulation ID header: The
X-SIMULATION-IDheader must be included in the SIP call. Check thatparticipant_metadatain your LiveKit code contains the simulation ID - Check conversation duration: Ensure your
max_conversation_timesetting gives enough time for the scenario to complete - Review agent behavior: Listen to the call recording in Evalion results to identify where the conversation went wrong
Need Help?
Technical Support
For technical assistance or questions about the integration process:
- Technical Onboarding: Schedule a call to receive your SIP address and complete setup
- Documentation: Refer to additional integration guides and API documentation
- Support Team: Contact our support team for troubleshooting and configuration help
Updated about 2 months ago